
Blog

detection of air leaks

Faster detection of air leaks

Even the smallest air leaks can lead to wasted products and energy and loss of production time, especially in a production line that can only function with compressed air to drive tools and processes. Detection of air leaks saves you a lot of money!

If there is not enough compressed air pressure to keep the equipment functioning optimally, there can be costly consequences. The more leaks there are in the system, the harder the compressor has to work to supply the required air to the equipment, which is not optimal for the compressor. This increase in demand increases the risk of insufficient compressed air being supplied to tools and process equipment.

Compressed air leaks also increase energy costs. According to the U.S. Department of Energy, a 1/8″ (3 mm) leak in a compressed air line can cost more than $2,500 a year.


Ask our experts for advice

A partner in air leak detection

How do you make sure you are not behind the curve in controlling air leaks when you have so many other priorities? That is the question a leading heavy equipment manufacturer recently saw answered when it discovered a new partner in the field of air leak detection.

This manufacturer uses between 3058 and 4417 m3/h of compressed air daily. That volume of compressed air serves up to 200 instant tools per line, as well as the process equipment responsible for moving large sheets of steel half an inch thick and positioning parts. Even if there is a leak in one line, it can affect production and increase energy wastage. And that's just one leak...

When Fluke offered the company the chance to develop the new Fluke ii900 Sonic Industrial Imager (Acoustic Imager), they immediately agreed. The ii900‘s array of small, super-sensitive microphones detects sounds in both the range of human hearing and the ultrasonic range and, even more uniquely, allows the user to actually ’see' sound for air leak detection.

“That we can now visualise where the problem is, adds a whole new dimension,” says the company's maintenance manager. “You can identify which thread, coupling or hose the leak is in. It's great to be able to identify on screen exactly where the leak is coming from.”

The ii900 can visually scan large areas up to a distance of 50 metres, speeding up detection of air leaks in the plant and significantly reducing the number of hours previously spent on that task.

“Sometimes we can find and repair as many as 30 to 40 leaks in a few hours,” says the manager. “And we can use the ii900 during production time, when extreme noise is produced, and still find leaks at the roof level 6 to 9 metres away.”

Scanning for leaks without affecting production offers a big advantage for the manufacturer. “Before, it didn't occur to us to test for air leaks during production because we couldn't cordon off the aisles and get people out of a certain area to go up and look at a possible leak,” says the manager. “Now we can stand along the sidelines and scan the air ducts above us while carts and people move underneath. We don't affect their operations and it's better for everyone.”


Read more
detecting gas and vacuum leaks

This is how you detect compressed air, gas and vacuum leaks AND find hidden profits

For industrial plants, compressed air, gas and vacuum systems are an essential source of converted energy. Compressors are simpler than other sources of energy such as electricity and they are everywhere in today's factories. They power machines, tools, robots, lasers, product handling systems and much more.

Yet many compressed air, gas and vacuum systems suffer from wear and poor maintenance, contributing to the biggest waste of all: ever-present leaks. These leaks may be hidden behind machinery or located at connection points, in fixed overhead lines or in cracked pipes or worn hoses. The waste increases rapidly and can even lead to downtime.

Ask our experts for advice


The high cost of wasted air

According to the U.S. Department of Energy, the US Department of Energy, a 1/8″ (3 mm) leak in a compressed air line can cost more than $2,500 a year. The Department of Energy estimates that an average US plant that is not properly maintained can waste 20% of its total compressed air production capacity due to leaks. The New Zealand government, as part of its Target Sustainability project, estimates that system leaks can account for 30 to 50% of a compressed air system's capacity. Rapid detection of compressed air, gas and vacuum leaks is a key factor in finding hidden profits. Air leaks can also lead to capital expenditure, rework, downtime or quality problems and higher maintenance costs.

To compensate for pressure loss due to leaks, business managers often tend to overcompensate by purchasing a larger compressor than necessary, which incurs significant capital costs and higher energy costs. System leaks can also lead to air equipment failure due to low system pressure. This can lead to production delays, unplanned downtime, quality problems, shorter lifespan and increased maintenance due to unnecessary switching compressors on and off.

For example, the maintenance manager of a manufacturer in the US says that low pressure in one of their air tools can lead to defects in their products. “Incorrect torque, either too low torque or too high torque, can result in recalls. This also leads to more man-hours in something that should be a very standard process,” he says. “It is throwing money down the drain through loss of profits and loss of products. At worst, demand may also be at risk because we could not deliver.”

It is no wonder that utilities, industry and government see compressed air systems as a potential source of cost savings. Leaks lead to waste. Fixing such leaks can save the company manager money and prevent the utility from having to build additional capacity into the system.

Detecting and fixing leaks is not easy

Unfortunately, the most common leak detection practices are rather primitive. An old-fashioned method is to listen for hissing sounds, which are almost impossible to hear in many environments, and spray soapy water on the area of the suspected leak, which is messy and could potentially be a slip hazard.

The current tool for detecting compressor leaks is a ultrasound detector, a portable electronic device that recognises high-frequency sounds related to air leaks. Typical ultrasonic detectors help find leaks, but their use is time-consuming and repair staff can usually only use them during scheduled downtime, while servicing other critical machinery may be a better use of time. These instruments also require the operator to be close to the equipment to find leaks, making the instruments difficult to use in hard-to-reach places such as ceilings or behind other equipment.

In addition to the time required to detect gas and vacuum leaks with suds or ultrasonic detectors, there may be safety issues with these techniques regarding finding leaks above or below equipment. Climbing ladders or crawling around equipment can be hazardous.

Pioneering for gas and vacuum leak detection

What if there was a leak detection technology that could determine the exact location of a leak up to 50 metres away, in a noisy environment, without having to turn off equipment? Fluke has developed an industrial thermal imaging camera that does just that. Industrial maintenance managers call the ii900 Sonic Industrial Imager “Pioneering” for compressed air leak detection.

This new acoustic industrial camera, which can detect a wider frequency range than traditional ultrasonic devices, uses the new SoundSight™ technology to provide enhanced visual scans of air leaks, as well as thermal imaging cameras detect hotspots.

The ii900 features an acoustic array of small, super-sensitive microphones that detect both sonic and ultrasonic sound waves. The ii900 recognises a sound source at a potential leak location and then applies algorithms that interpret the sound as a leak. The results produce a SoundMap™ image, a colour map overlaid on top of the visible-light image, - showing exactly where the leak is. The results are displayed on the 7-inch LCD screen as a still image or real-time video. The ii900 can store up to 999 image files or 20 video files for documentation or compliance.

Large areas can be scanned quickly, detecting leaks much faster than other methods. Filtering can also be done by intensity and frequency ranges. A team at a large factory recently used two ii900 prototypes and detected 80 compressed air leaks in one day. The maintenance manager said that using traditional methods it would have taken weeks to find that number of leaks. By quickly detecting and fixing leaks, the crew also avoided potential downtime, which can cost an estimated $100,000 an hour in lost productivity at this plant.

Where to find leaks:

  • Links
  • Snakes
  • Tubes
  • Fittings
  • Threaded pipe connections
  • Shortcuts
  • FRLs (combinations of filter, regulator and lubricator)
  • Condensate traps
  • Valves
  • Flanges
  • Gaskets
  • Air supply boilers

How much air do you waste?

The first step in controlling gas and vacuum leaks is to estimate the leakage rate. Some leakage (less than 10%) is to be expected. Anything more is considered wastage. The first step is to determine your current leakage load so that you can use it as a benchmark against which to compare improvements.

The best method for estimating leakage load is based on your control system. If you have a system with start/stop control, simply start your compressor when there is no demand in the system - after working hours or shifts. Then measure a number of compressor cycles to determine the average time before the loaded system is unloaded. If there is no equipment in operation, the unloading of the system is due to leakage.

Leakage (%) = (T x 100) ÷ (T + t)T = load time (minutes), t = relief time (minutes)

To estimate the leakage load in systems with more complex control strategies, place a pressure gauge downstream of the volume (V, in cubic metres), including all secondary boilers, mains and pipes. If there is no demand in the system, except for leakage, bring the system to normal working pressure (P1, in psig). Select a second pressure (P2, about half the value of P1) and measure the time (T, in minutes) it takes the system to drop to P2.

Leakage (cfm free air) = [(V x ( P1 - P2) ÷ (T x 14.7)] x 1.25

The multiplier 1.25 corrects leakage to normal system pressure, taking into account lower leakage as system pressure decreases.

Efficiently fixing and repairing leaks can lead to significant cost savings for air-dependent businesses. Companies can not only save on energy consumption by repairing leaks, but can also improve production and extend the life of equipment.

Read more

Fluke power quality & energy conservation seminar on 14/11/23 (recap)

Curious about what solutions Fluke has to offer regarding power quality issues and energy savings?

Belgium is electrifying. Solar panels, inverters, home batteries and heat pumps are here to stay. Via the charging station, the electric car also gets a place in the network, as a consumer, but also as a buffer capacity and energy supplier.

All this makes the challenges of managing generation, storage and consumption of electrical energy in homes and buildings enormous. Electrical components are being added and distribution boards expanded.

With safety first, we need to take the necessary action to have a clear understanding of the constantly changing situation. Fluke must -and is- going along with this. Adhering to the time-honoured ‘measuring is knowing’ adage. But ‘what’ should I measure to know ‘what’.

In this half-day seminar, you will learn what Fluke can offer as measurement solutions.

Retrospective

View here How the seminar went.

Programme

09.00-9.45:

  • PQ – Power Quality

10.00-10.45 am:

  • EV - Charging stations

11.00-11.45 am:

  • Decentralised generation systems

12.00 -12.45 pm:

  • Thermography

12.45pm:

  • Sandwich lunch

Fluke has the tools to give you insight into the puzzle of the electricity network within your company. LHM has the expertise to assist you in the various aspects of this.

From the perspective of the T&M expert - we take you through a helicopter view with what Fluke measurement solutions can do for you.

Read more
Hydrostatic testing

Hydrostatic testing with the Additel 206Ex

Hydrostatic testing (also known as stack testing or a hydrotest) is a method for pressure testing different containment vessels.
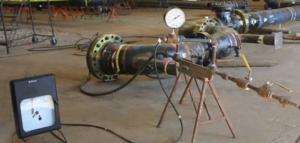
Hydrostatic testing is used in a variety of applications.
The most common applications for these tests are:
- Pipelines
- Tanks
- Homeowner use for plumbing
- Natural gas lines
- Fire extinguishers
- Gas cylinders
- Boilers
- Compressors
- Fire suppression systems such as sprinkler systems
- Distribution systems

Compared to other methods of testing the strength of a container, hydrostatic testing is one of the safest tests you can use to find your results. Essentially, hydrostatic testing can check the integrity of a container vessel and also check for leaks in your system.

Hydrostatic testing uses water as the test medium.
medium, which as we know is NOT compressible. If there is a leak in a pipe system or a failed integrity test of the pipes, the result is that water bursts out of that area while very little pressure is applied.
Generally, hydro tests are performed at 1.5x the nominal pressure of the containment vessel. The vessel, pipeline, tank or whatever application you have is partially filled with water and then pressurised to 1.5x the value of the nominal pressure. Most hydro tests take about 8 hours, but it is not uncommon for a test to take up to 24 hours!

Equipment needed

The equipment used to perform these hydrostatic tests is quite outdated and much of it has not changed since hydrostatic testing became the most reliable test for these applications.
not changed since hydrostatic tests became the most reliable tests for these applications. The typical
equipment list for these tests consists of:
- Chart recorders for pressure and temperature
- Lead weight testers
- Pressure relief valve
- A pressure gauge showing the pressure in the pipes

A card recorder? What are you wondering? Traditionally, hydrostatic tests a a card recorder for pressure and temperature to record these measurements. Card recorders were invented in the mid-1800s and were first used for testing in 1915 and the technology has never really never really changed.
Essentially, a chart recorder is a piece of circular paper that rotates in a circle. As the paper rotates, there is a pen for temperature and a pen for pressure. These pens “convey” the temperature and pressure readings for the duration of the test. Many recorders require a key to wind up the clock. wind up, just like your grandfather's clock from 1900! Later, there was a huge advance of the 9v battery to replace the wound coil and that's pretty much where the innovation in this field stopped.

With this 100-year-old testing method, there are many things that can cause an error in this test.
With tests lasting 8 to 24 hours, you really have time to waste on pens running out of ink, technicians losing their paper results, liquid getting on the paper and bleeding your ink, coils needing to be wound up, batteries running out, card storage, etc. Imagine the heartbreak if you pick up your chart after 24 hours and the pen didn't work after hour number 2! Chart recorders are still often used in situations where instant visuals of a test are needed, but perhaps there is no access to power or no access to a computer. However, with today's data recorders reducing cost and power requirements, the chart recorder is fast dying out as the preferred method for these tests. Besides these data recorders, you usually also need a pressure gauge placed in the line and a pressure relief valve.
valve. So wait, are we saying that we no longer need to use 100-year-old technology? Yes indeed!

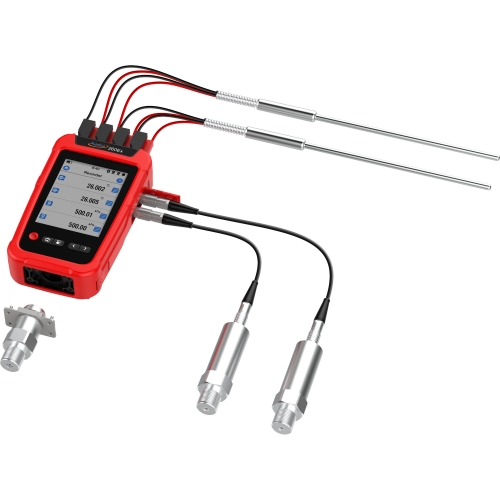
Meet the Additel 260Ex!

This device brings you into the world of running your hydrotests digitally! digital way! Instead of lugging 50lb chart recorders, changing paper and pens, winding up coils and in the rain with a rain with a rubbish bag to cover the chart recorder... now it can all be done digitally and in the palm of your hand. In the digital version of this test, we replace the analogue gauges with our digital pressure sensors.
We replace the RTD whose results are stored with pen and paper and use resistance temperature detectors (RTDs). With the Additel 260Ex you can connect 2 RTD devices for your ambient temperature and pipe temperature. You can use the pressure modules to record pressure and pressure and you throw paper charts in the bin and save your results digitally. in the bin and save your results digitally. When you run your hydro test with our 260Ex, this is what you would expect:
- Using the 260Ex pressure module to monitor and store internal pipe pressure
- One RTD for pipe surface temperature
- One RTD for ambient air temperature or soil temperature

Now we record all three parameters of our tests with one device and we do everything at the same time! At the end of your test, simply transfer the results to a PC and print them out.
A huge advantage of our 260Ex is, of course, that you no longer have to carry 300lbs of equipment with you to your test. There are no more lost chart papers and no more spoilt tests, all with more accuracy, more storage space for test results, less cost and a much cheaper annual calibration. the ability to view your test results in real time as they are recorded!
The Additel 260Ex has internal storage for up to 10,000,000 data points, which is more storage space than you will ever need and more than can even be stored on a piece of paper. The Additel 260Ex also connects to our mobile phone app, Additel Link. Now you can view your real-time test results from the cosiness of your truck with the heating or air conditioning on! You can use up to 8 measurement channels on the 260Ex and navigation is a breeze thanks to the 4.4″ LED backlit touchscreen. Is it raining during your test? No worries, the Additel 260Ex has an IP67 waterproof rating.

The ADT260Ex meets the most stringent ATEX, IECEX, CSA and UKCA certifications for intrinsic safety. Each device meets certification level Ex ia IIC T4 Ga. This highly qualified reference recorder can be widely used in environments with potentially explosive gases, such as oil and gas platforms, refineries, chemical and petrochemical plants, the pharmaceutical, energy and gas processing industries. Bring your testing into the 21st century and eliminate failures with our new 260Ex!

Read more
checking the valve position

How to keep control valve positioners in place

Valves, the actuators that move them and the electronic circuits that control them, are designed for intensive daily use. A valve can be moved hundreds to tens of thousands of times over a period of one year. This can cause screws to shift, springs to weaken and mechanical connections to loosen. The valve seat wears out both from the repeated movement of the valve and from the liquid or gas flowing through it.

In addition, electronic components suffer from ‘calibration drift’, causing valves to fail to open or close completely, close prematurely or operate erratically. This results in the gas or liquid flowing through them no longer being regulated properly.

To avoid this, it is important to establish a preventive maintenance programme where the positioners are regularly checked in the field. These checks should be carried out quickly to minimise downtime. When calibration drift occurs, a quick recalibration should be performed.

Six steps for checking valve position

The following are the basic steps for checking the valve position. Always refer to the valve manufacturer's specific instructions for testing and calibrating the positioner.

1. Setting
Set the Fluke 789 Set ProcessMeter in source mode using the appropriate current range for the positioner.

Connect the test leads to the mA source outputs on the Fluke 789.
Select the 4-20 mA range by turning the rotary knob from Off to the orange upper mA output position.
Connect the Fluke 789 to the inputs of the valve.

2. Testing the closing of the valve
To determine whether a positioner closes the valve completely at the 4.0 mA current level.

Set the source current to 4.0 mA on the Fluke 789 ProcessMeter by pressing the 0% button under the SpanCheck button.
While checking that the valve moves, press the Coarse Down button once to reduce the current to 3.9 mA. The valve should not move.
Adjust the zero setting on the positioner to set the valve for the desired closure.

3. Testing the opening of the valve
To check valve opening, press the Coarse Range button when the current source is set to 4.0 mA. The Fluke 789 ProcessMeter increases the current by 0.1 mA with each press of the Coarse Range button.

Note: When setting the point at which the valve starts to open, make sure that the actuator does not exert back pressure against the force holding the valve closed when 4.0 mA is applied to the controller input.

In a spring-closing valve, no pressure should be applied to the diaphragm.
In a double-acting piston actuator, no pressure may be applied to one side of the piston.
You can set the point at which the valve starts to open between 4.1 and 4.2 mA to ensure no back pressure is applied against the forces at the closed setting.

4. Range position testing
Range position testing involves testing the valve in the fully open position.

Press the SpanCheck 100% button, which moves the source current to 20 mA. Use the range buttons on the Fluke 789 ProcessMeter to adjust the source current for a reading of 20 mA and wait for the valve to stabilise.
While visually checking or sensing the valve movement, press the Coarse Up button once to 20.1 mA.
Use the Coarse knob to adjust the current up and down between 20.1 mA and 19.9 mA. The valve stem should not move between 20.1 to 20 mA and move slightly between 20 mA and 19.9 mA.

5. Linearity testing
For valves with linear operation.

Set the Fluke 789 ProcessMeter to 4 mA.
Use the % Step button to increase the current to 12 mA (50%) and confirm that the valve position indicator is at 50% of stroke.
Note: If your valve is not linear, refer to the valve manual for proper operation.

6. Testing smooth operation of valve
Set the rotary switch to the lower mA output and select the Slow Ramp function with the blue button.
Run the Fluke 789 ProcessMeter through several cycles while visually checking or feeling that the valves are operating normally. The valve should NOT rock or chase any of the Slow Ramp step positions, nor move slowly.
Adjust the gain of the valve regulator to the point that gives the best response between these two conditions.

Five ways Fluke Connect features improve positioner testing in the field

The Fluke 789 FC ProcessMeter and temperature kit offers all the power and capabilities of the Fluke 789 ProcessMeter and the FC connector that gives you access to all the capabilities of the Fluke Connect app on your smartphone, including the ability to:

1. Archive measurements with the EquipmentLog™ history feature in Fluke Cloud™ storage for documentation and future reference in the field.

2. Compare real-time measurements with historical data.

3. Contact other technicians and your manager via a ShareLive™ video call function to show them exactly what you see and get instant feedback.

4. Stay further away from hazardous environments by placing the Fluke 789 FC ProcessMeter at the valve and viewing the results on your smartphone.

5. View digital product manuals, application advice from Fluke and other field resources via your smartphone.

Read more
calibration of equipment

How calibration helps optimisation

Fluctuating commodity prices make it challenging for companies to adjust to the times and maintain good profit margins. One way to control costs across industries is to become leaner and more efficient.

And one of the best ways to control these costs is to find the waste in your process. With regard to instrumentation, this means making many precise adjustments to achieve just the right the temperature and pressure for high-quality production and efficient use of resources.

Equipment calibration leads to better optimisation and higher quality. This also applies to other sectors of the process industry, be it the chemical process industry, nuclear industry, pharmaceutical industry or pulp and paper industry. Manufacturing plants for the process industry use hundreds or even thousands of sophisticated devices that constantly perform countless critical operations in an accurate and reliable manner. These devices themselves also need regular inspection, testing, calibration and repair.

Over the centuries, the importance of carefully recording the details of these inspections, tests, calibrations and repairs has become clear. It is not just a best practice; companies and governments often have highly specific administrative requirements to ensure that customers receive products of the highest quality and the health and safety of citizens are protected.

However, traditional testing, calibration and documentation processes are labour-intensive; because experienced users are scarce, downsized teams sometimes choose to postpone regular calibrations. The latest industry findings suggest that it is feasible for smaller teams to perform and document equipment calibrations at a lower overall cost, with greater productivity and operational reliability benefits.

Calibration of equipment is usually performed at the site of the device (in-situ calibration, from Latin for ‘in place’) or in an instrument workshop.

Professional tip:

During production of a field instrument, both the primary element and the transmitter (or actuator, if a control valve) are calibrated at the factory and calibration information is supplied with the unit. This calibration data is often lost. Entering this information into centralised calibration data as soon as the unit is put into service should be part of standard work and not just done to increase efficiency.

By centralising calibration information, the knowledge stays with the facility even if the teams change.

Most field instruments consist of two parts: a primary element and a transmitter.

  • Primary elements include flow tubes, measuring flanges, pressure sensors, wet chemical sensors such as pH, ORP and conductivity probes, level gauges of all types and temperature sensors. Primary elements usually produce a signal - usually voltage, current or resistance - proportional to the variable they measure, such as level, flow, temperature, pressure or chemical composition. Primary elements are connected to the input of field transmitters.
  • Field transmitters include pressure, temperature and flow devices. They process the signal generated by the primary element by first characterising it in linear form and applying unit of measurement coefficients to it. The signal is then transmitted in analogue (usually 4-20 mA DC) or digital form (usually a variety of fieldbuses).

calibration of equipmentAnalogue devices

Analogue devices, often called ‘4 to 20 mA loop devices’, are so called because they transmit a signal that is an electrical “analogue” representation of a measured physical quantity (e.g. temperature). They transmit an electric current that is proportional (analogue) to the magnitude of a measured physical quantity, with 4 mA representing the minimum scaled value and 20 mA the maximum scaled value.

Although many aspects of systems are now digital, analogue devices are still used in the process industry.

Digital devices

Digital devices convert a measured physical value into a digital signal. Many different digital coding methods are used in the process industry, including Foundation Fieldbus, Profibus and HART.

It is widely believed that (digital) fieldbus devices do not need to be calibrated. However, this is not true. Although a fieldbus signal (whether Foundation Fieldbus, Profibus or connected HART) provides diagnostic information, it does not provide any information about the accuracy of the device, nor does it check whether the device provides an accurate representation of the process.

Top 3 calibration tools to keep your processes lean

1. Additel ADT227 multifunction documenting calibrator with HART functionality and automated calibration procedures; the ADT227 is also available in ATEX version.

2. Additel ADT760 Automatic precision pressure calibrator with documenting function and HART functionality

3. Fluke 754 multifunctional documenting calibrator with HART functionality and automated calibration procedures; the calibrator naturally complies with strict safety standards.

Control valves

Control valves have actuators that also need to be calibrated to compensate for wear and tear and the effects of valve sticking and when the valve has been resealed to correct leaks. Often, when these valves are not operated regularly, a stroke test or partial stroke test must be performed for them to ensure reliable operation.


Ask our experts for advice

Permits and paperwork

Administrative tasks, from applying for permits to documenting and archiving results, can add significantly to the cost and time required for even an in situ calibration. As Ian Vergebeuren of Industrial Automation Networks and a former chair of the Fieldbus Foundation User Group says, “In many cases, getting all the necessary paperwork (permits, isolation, etc.) takes longer than the work itself.”

Challenges in documenting calibrations

Documenting a calibration has traditionally meant manually recording the date and time, pre- and post-calibration values and other comments made by mechanics in a logbook. Surprisingly, many companies continue to document calibration data manually. But handwritten documentation is far from ideal.

Firstly, the likelihood of errors is higher. Handwritten data is often illegible or incomplete. Facilities using a computerised maintenance management system (CMMS) then have to take into account the extra time required to enter handwritten data, which adds another risk of errors.

Changes within workforce

Another challenge for calibration is a change in the workforce.
The 1980s saw budget cuts and layoffs. Countless engineers, maintenance workers and operational staff were laid off following a new lean manufacturing philosophy that is still followed today, especially in developed economies.

Smaller teams have less time for on-the-job mentoring and training, to the point where employees have no time to transfer their equipment- and system-specific knowledge. Once older operators and engineers retire, they take their equipment and systems knowledge with them.

“Every day at 16:00, virtually all plant knowledge walks out the door, and sometimes for good,” says the Chief Instrumentation and Controls Engineer at a large refinery in the Midwest.

Meanwhile, many companies still need two technicians for each in-situ calibration: one at the transmitter and one at the control system. The Fieldbus Foundation estimates that two technicians require a minimum of two hours for commissioning.

calibration of equipmentUse multifunction documenting calibrators

A new generation of ‘smarter’ field calibrators increases employee productivity by combining multiple instruments into one and offering features that go beyond basic testing and measurement, including help with analysis and documentation.

Multifunctional documenting process calibrators are portable, electronic test and measurement instruments that combine multiple calibration steps and functions in one device, simulating and measuring pressure, temperature and a wide range of electrical and electronic signals.

Advantages:

  • Technicians need to master fewer instruments and take them into the field
  • Same calibration processes and data output on multiple devices instead of having to follow a different process for each instrument to collect a different set of data
  • Automated procedures replace many manual calibration steps
  • No second technician is needed to record the ‘as found’ and ‘as left’ status of the field instrument.
  • Faster calibration time per device
  • Calculate the error of one instrument instead of adding up the errors of different instruments

Use calibration routes

With a documenting calibrator, the greatest savings can be achieved by using the route management function integrated into the instrument. Using one set of permits and paperwork for a full set of calibrations significantly reduces costs.

Implement an asset management, calibration management or computerised maintenance management system (CMMS)

Unlike paper documentation, data on the calibrator are never illegible, inaccurate or incomplete. Calibrator data can be downloaded directly to various CMMS systems without transcription or archiving.

Documenting process calibrators automatically capture on-site ‘as-found’ and ‘as-left’ status of each field device and can be operated by a single technician. As a result, using route-based procedures on documenting calibrators can reduce the time and cost required by as much as 50% compared to traditional manual single-device calibration methods. In other words, the same lean team can perform twice as many calibrations in the same period of time.

Running a lean team according to traditional operational requirements undoubtedly leads to mistakes. Calibrations are simply not carried out as they should be. Instead of ignoring the threat, explore how existing activities can be run more efficiently.

Implement route-based calibration, paperless documentation and CMMS data management. More calibrations are performed more accurately, knowledge is transferred from one person to the team and the company, and both productivity and quality increase.

Calibrating multiple instruments during a route reduces the cost per calibration compared to calibrating individual instruments separately.

In addition, millions can be saved on maintenance costs, legal fees and the cost of lost revenue due to accidents. Good calibration procedures help reduce the likelihood of such incidents. In the event of an emergency or legal action, companies can defend themselves with accurate calibration data, whereas this is a lot more difficult when calibration data is not in order.

Read more
problems with mains power quality

Concise guide to symptoms and causes of mains power quality problems

To the untrained eye, problems in electrical networks or equipment connected to the circuit may not be recognisable as problems with mains power quality. If there is no obvious identifiable problem, it may be dismissed as “just an old circuit breaker that needs replacing” or “a one-off annoying reset”. You can look at the types of loads on the system and check for harmonics, imbalance or fault patterns.

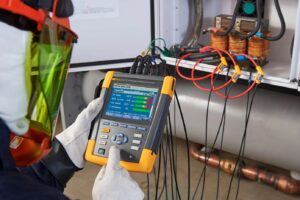
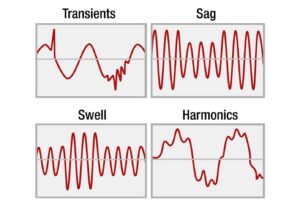
Problems with harmonic distortion and voltage and current anomalies represent the areas where many mains power quality problems occur. Deviations in voltage and current can cause problems, but can often be fixed before they damage equipment. Discover the symptoms:

Ask our experts for advice

Problem

Symptoms

Possible causes

Dips or falls

Dimming of lights, computer crashes, clattering of relays and contactors or complete failure, shutdown of equipment and system
Unjustified and unexplained alarms and stops

Starting large loads, especially large inductive loads
Similar activities in neighbouring facilities
Severe weather

Voltage spikes

Faulty power supply
Overvoltage shutdown and alarms on frequency-controlled drives (VFDs)

Failure in single phase of three-phase system
Sudden decrease in load
Switching between condenser groups

Transients

Effects of flashover and spark discharge in distribution equipment
Damaged insulation
Faulty electronics
Computer crashes

Lightning strikes
Switching capacitors
Restarting systems after a power failure
Sudden downtime of large equipment
Dirty or worn contactors

Interruptions

Shutdown of equipment

Momentary loss of mains power

Imbalance

Overheated three-phase motors and transformers

Unbalanced loads across separate phases of three-phase panels
Unbalanced supply of utilities
Operation of single-phase welders
Open-delta transformers

Harmonischen

Open-delta transformers
Overheated transformers
Overheated inductive motors
Unjustified and unexplained alarms and stops of electronic equipment

Non-linear loads such as switching power supplies
Inverter sections of uninterruptible power supply (UPS), VFDs and battery chargers
Welders
Electric arc furnaces

Power Quality Analyzers and loggers

A Power Quality Analyzer  can help identify these common power quality problems. With a Power Quality Analyzer, you will never miss another crucial power quality event. Whether you are performing a quick system check or a detailed power quality analysis, consistent data is essential. By connecting the 1770 Series to your assets, the instrument provides a unique automatic measurement system that ensures you collect the right data every time - from fast transients up to 8 kV, harmonics up to 30 kHz, dips and spikes, to the voltage, current and power measurements that allow you to characterise problems in your electrical system.

Power Quality Loggers make it easy to profile energy consumption in your installation. They provide data on current measurements, allowing you to detect and mitigate sources of electrical energy waste or overloaded circuits. These tools are great to have on hand for routine load studies and preventive maintenance programmes.

Power Quality Recorders are the right tool for advanced power quality analysis. Unravel the root cause of equipment failures with load studies and transient analysis, so you can go back later and make necessary repairs or develop baseline data for routine load studies.

Read more
Efficiency and reliability of electric motors

Efficiency and reliability of electric motors: New test conditions match real operating conditions

Electric motors are the most important component in many industrial processes. They can account for as much as 70% of the total energy consumption in an industrial plant, and they consume up to 46% of all electricity generated worldwide. Given their critical nature for industrial processes, the cost of downtime due to faulty motors can amount to tens of thousands of euros per hour. Ensuring efficiency and reliability of electric motors, is one of the most important tasks maintenance technicians and engineers face on a daily basis.

The efficient use of electricity is not merely ‘pleasant’. In many situations, energy efficiency can mean the difference between profitability and financial losses. And since motors consume a significant proportion of energy in the industrial sector, they have become the main target for achieving savings and maintaining profitability. In addition, the quest for cost savings and efficiency improvements and the reduction of dependence on natural resources has led many companies to adopt industry standards such as ISO 50001. The ISO 50001 standard provides a framework and conditions for establishing, implementing and maintaining an energy management system to achieve sustainable savings.

Traditional test methods for electric motors

The traditional method of measuring electric motor performance and efficiency is well-defined, but the process can be expensive to set up and difficult to apply in work processes. In fact, checking motor performance very often even requires shutting down the entire system, which can lead to costly downtime. To measure the efficiency of electric motors, both electrical input power and mechanical output power must be determined over a wide range of dynamic operating conditions. According to the traditional method of measuring motor performance, technicians must first install the motor in a motor test stand. The test stand consists of the motor to be tested mounted to a generator or a power test bench.

The motor being tested is connected to the load with a shaft. A speed sensor (tachometer) is connected to the shaft as well as a number of torque sensors, which provide data from which mechanical power can be calculated. This system provides data including speed, torque and mechanical power. In some systems, electrical power can also be measured to calculate efficiency.

The return is calculated as follows:

During testing, the load is monitored to determine the efficiency over a range of operating modes. The test setup may seem straightforward, but there are some inherent drawbacks:

  1. The motor must be taken out of service.
  2. The motor load is not truly representative of the load driven by the motor during operation.
  3. During testing, operation must be delayed (leading to downtime) or a replacement motor must be temporarily installed.
  4. Torque sensors are expensive. They have a limited range, so multiple/different sensors may be needed for testing different motors.
  5. An engine test stand suitable for a wide range of engines is expensive and users of this type of test stand are usually specialist engine repair shops or engine development companies.
  6. No account is taken of ‘real’ operating conditions.

Parameters of electric motors

Electric motors are designed for specific load-dependent applications and therefore have different characteristics. These characteristics are classified according to standards of the National Electrical Manufacturers Association or the International Electrotechnical Commission and have a direct effect on the motor's operation and efficiency. Each motor has a nameplate showing the motor's main operating parameters and efficiency data according to NEMA or IEC recommendations. The data on the nameplate can be used to compare the motor's requirements with actual operating conditions. When comparing these values, you may discover, for example, that a motor exceeds the expected speed or torque, which may shorten the motor's life or cause premature motor failure. Other effects such as voltage or current imbalance and harmonics associated with poor mains power quality can also lead to poor motor performance. If any of these conditions occur, the power of the motor - i.e. the expected motor performance - must be reduced, which can lead to process disturbance if insufficient mechanical power is generated. The power reduction is calculated according to the NEMA standard in accordance with the specified data for the motor type. While the NEMA and IEC standards have some differences, they largely follow the same lines.


Schedule a consultation

Real operating conditions

Testing electric motors on a motor test stand usually means testing the motor under the best possible conditions. Conversely, when the motor is operated under real-world conditions, these best operating conditions usually do not exist. These differences in operating conditions all contribute to the deterioration of engine performance. For example, within an industrial plant, loads may be installed that directly affect the mains power quality, causing system imbalance or possibly harmonic distortion. Any of these conditions can seriously degrade motor performance. In addition, the load driven by the motor may not be optimal or consistent with the motor's original design. The load may be too large for the motor to drive properly, or overloaded due to poor process controls. The load may even be hampered by excessive friction caused by a foreign object blocking a pump or a fan impeller. Recording these anomalies can be difficult and very time-consuming, making effective troubleshooting problematic.

A new approach

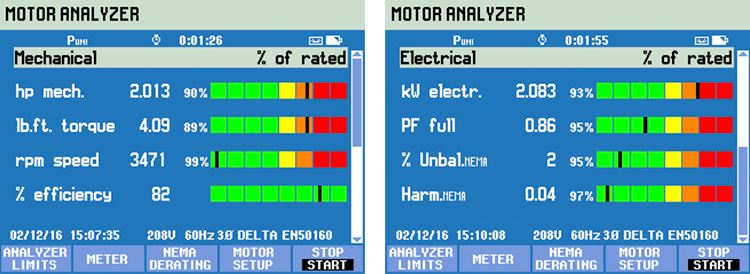
The Fluke 438-IIanalyser for mains power quality and motors provides a streamlined and cost-effective method for testing motor efficiency, eliminates the need for external mechanical sensors and avoids costly downtime. Based on the Fluke 430-II series of mains power quality and energy analysers, the Fluke 438-II has the full functionality for measuring mains power quality while also measuring mechanical parameters for direct-coupled electric motors. Using data on the motor nameplate (either NEMA or IEC data) combined with three-phase power measurements, the 438-II calculates real-time motor performance data such as speed, torque, mechanical power and efficiency, without the need for additional torque and speed sensors. The 438-II also directly calculates the reduction factor of the motor during operation.

The data required by the Fluke 438-II to perform this measurement is entered by the technician or mechanic and includes rated power in kW or hp, rated voltage and current, rated frequency, rated cos φ or power factor, rated duty factor and motor design type of NEMA or IEC classes.

How it works

The Fluke 438-II is capable of mechanical measurements (motor speed, load, torque and efficiency) by applying proprietary algorithms to electrical wave signals. The algorithms combine a mix of physics- and data-driven models of an induction motor, without requiring any of the pre-measurement tests usually required to estimate motor model parameters such as stator resistance. Motor speed can be estimated from the harmonics in the current waveforms produced by the rotor slots. Motor shaft torque can be related to voltages, currents and slip of the induction motor through known but complex physical relationships. Electrical power is measured using the waveforms of the input current and voltage. After estimating torque and speed, mechanical power (or load) is calculated by torque times speed. Motor efficiency is calculated by dividing the estimated mechanical power by the measured electrical power. Fluke has conducted extensive tests on instrumented motors driving power test benches. Actual electrical power, motor shaft torque and motor speed were measured and compared with the values reported by the 438-II to determine accuracy levels.

Overview

While traditional methods for measuring the performance and efficiency of electric motors are well defined, they are not necessarily widely used. This is largely due to the cost because of the downtime involved in shutting down motors, and sometimes entire systems, for testing purposes. The Fluke 438-II provides extremely useful information that has previously been extremely difficult and expensive to obtain. In addition, the Fluke 438-II are advanced mains power quality analysis functions to measure mains power quality while the system is in full operation. Critical motor efficiency measurements are simplified by eliminating the need for external torque sensors and separate speed sensors. This allows the performance of most industrial electric motor-driven processes to be analysed while in operation. This allows technicians to reduce downtime and identify motor performance trends over time, giving them a better picture of the overall condition and performance of the system. By recording trends in performance, changes that may indicate impending motor failures can be identified and replacement is possible before these failures occur.

Read more
Industrial energy waste

Detecting industrial energy waste

Industrial energy wasteDetecting industrial energy waste is a two-part story. On the one hand, there is intention and, on the other, there is strategy. Industrial facilities in the United States continue to express interest in energy management. This is the intention: reduce overall energy use or maintain this use at a certain level, but in the process produce more per kW consumed.


Ask our experts for advice

Then there is strategy. And this is where the shoe can sometimes wriggle.

In a manufacturing environment, a strategy can only work if there is enough knowledge and experience to support the vision, but sufficient ROI must also be realised to ensure that everything is worthwhile. But as for Industrial Energy Wastage, there is no research institute anywhere where an industrial plant manager can go to determine what is “reasonable” energy consumption in a production facility. So how can one then assess what part of the current energy consumption is reasonable and what part is wasteful, or what part of that wasteful part provides enough efficiency to justify intervention?

The return we are talking about here includes the cost per kWh charged by the power company. The rates of these vary, depending on the time of day and time of year. Reducing these costs also leads to immediate cost savings. The investment consists of the material and labour required to change the energy consumption. The return is the period of time that must pass before the lower energy bill leads to the creation of returns. What remains after the costs have been paid is then the icing on the cake.

If we then look again at the strategy, how can we estimate how much return these interventions are going to generate if there is no industry standard for reasonable energy consumption against which to measure it?

Profiling Industrial Energy Waste

Energy consumption in the industry varies and this is due to several factors:

  • the age of the factory
  • the type of load and its format
  • operating schedule, both hours per week and intensity of load
  • the number of employees
  • climate
  • the maintenance philosophy.

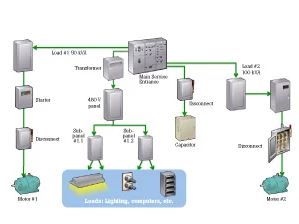
The answer to this question is: don't try every kW to manage consumed by your facility. These are the ‘knowledge and experience’ in the equation. Divide the facility by electrical infrastructure and then by key systems.

Energy conservation starts with two basic tactics: (1) general inspection of key systems and (2) targeted data collection, including logging energy consumption at main service inputs and at key load points.

Establish what the specified consumption of a system is and how much the system currently consumes. In addition, establish how much waste is occurring (either in terms of hours and type of use of the system or in terms of equipment and the system itself). To realise the savings, this waste needs to be addressed in the facility, through changes in procedures, maintenance or equipment and controls.

Energy components

Before we start looking at how to be able to track energy consumption, we will take another look at how we define and measure energy.

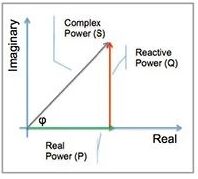
Energy can be expressed in terms of real, reactive and apparent power (Figure 1).

The flow of energy is described as:

  • actual (P) or active power in watts (W)
  • reactive power (Q) in volt-amps reactive (VAr)
  • complex power (S) in volt-amps (VA)
  • apparent power, the size of complex power (VA)

The mathematical relationship between real, reactive and apparent power can be represented by vectors or can be expressed by complex numbers, S = P + jQ (where j is the imaginary unit).

Reactive power does not transfer energy - it does not produce labour - and is thus represented as the imaginary axis of the vector diagram. Real power moves energy, so this is the real axis.

The speed of energy flow in a system depends on the load - is it resistive, reactive or both?

With a purely resistive load, voltage and reverse polarity of current simultaneously, the product of voltage and current is positive at all times and only real power is transferred: labour is produced.

If the load is purely reactive, the voltage and current are out of phase and the product of voltage and current can be positive or negative. This indicates that part of the energy is transferred to the load and part of it flows back. The net transfer of energy to the load is zero: no work is produced.

In reality, all loads include a combination of resistance, inductance and capacitance, creating both real and reactive power in a system. Therefore, electrical systems are designed to tolerate a certain amount of reactive power. Problems arise when too much reactive power is generated. Not only is there not enough real power to produce the required labour, but even the system's overall capacity to generate labour is compromised. This is also why utilities fine their customers if their loads produce too much reactive power: it is wasted power because it costs money to generate it, but it cannot be used. Most utility bills count VAr (reactive power) and on many they also calculate the power factor, where the power factor is an indication of how much a system has dropped relative to 100 per cent actual power. Most utilities require their customers to stay above the 0.95 PF (Power Factor) limit.


Schedule a consultation

Monitoring energy consumption

By understanding the basic components of energy, an electrician can equipment for logging energy consumption set to measure the overall level and quality of consumption and then track when energy is consumed and by what.

Log power at main and secondary panels and at large loads. Record kW, kWh and power factor over a representative time period.

This gives you a very accurate picture of the actual energy consumption for three-phase circuits and loads.

You can achieve the biggest energy savings by determining at what times power consumption peaks, evaluating power factor and total power consumption against utility bills, and rebalancing loads if necessary. Even a peak consumption of just a few minutes can increase the utility's tariff for several hours, days or even weeks.

By scheduling the use of taxes differently, a company can take advantage of times when energy is cheaper. See how far below ‘1’ the power factor is and check the power company's bills to see if there are deductions for a bad power factor. If so, the Power Logger can help trace the sources. After making changes in the necessary power areas, reconnect the logger to check that you are indeed benefiting from these efficiency improvements.

Detecting industrial energy waste

Knowing where energy waste occurs

Every system and process can be a source of waste and this needs to be contained or eliminated. You can already start by scrutinising electrical subsystems, compressed air or steam systems and specific electromechanical systems, but actually every process has potential waste points that need to be measured.

The aim is to map the energy use of specific equipment and processes, to see where energy is wasted so that waste can be quantified. This allows you to prioritise improvements or replacements based on the life of the equipment and see which modifications yield the most return on investment.

Mapping consumption also provides a starting point from which the effectiveness of energy-saving projects can be measured to justify costs.

Common sources of waste in electrical subsystems:

  • Taxes sometimes remain switched on outside working hours or are unnecessarily in operation at the most expensive time of the day.
  • If no regulation is set on the motor, it may mean that more power is generated than needed.
  • Processes with excessive voltage/current cause excessive power consumption to compensate.
  • Phase imbalance causes power to be consumed at load without being able to deploy it.

Identify and quantify:

  • Make a thermal scan of the electrical panel and mechanical load to check for overheating.
  • Log energy consumption over a longer period: how much energy is consumed, at what time and how much waste is involved?

Common waste and inspection points in electromechanical systems:

  • Excessive friction due to misalignment, bearings, imbalance and looseness forces the engine to work too hard, consuming too much power.
  • Uncontrolled loads sometimes remain switched on outside working hours, operate at peak times, generate more power than needed or suffer from overvoltage/current conditions and phase unbalance.
  • Ageing mechanical equipment can use so much more energy than new high-efficiency models that early replacement may be justified by the lower kWh consumption alone.

Identify and quantify:

  • Make a thermal scan of the drive panel and mechanical load to check for overheating. Overheating may indicate electrical inefficiency.
  • Log energy consumption over a longer period: check for total kWh, power factor, peak demand, imbalance and harmonics.
  • Test vibration levels against standards and identify the most appropriate maintenance solutions, such as rebalancing.
  • Perform a thermal scan of couplings/shafts/belts, bearings and fans.
  • Check current and voltage levels.
  • Perform a thermal scan of the termination/connection box and windings and perform an insulation resistance test.

Common waste and inspection points in compressed air systems:

  • Excessive leakage in compressed air lines leads to excessive operation to maintain supply.
  • Compressors that remain switched on outside working hours waste energy.

Identify and quantify:

  • Log energy consumption at the compressor and compare it with base consumption.
  • Measure the pressure at the compressor and at the point of use to determine the pressure drop.
  • Scan pipes with ultrasound to identify leaks.

Common waste and inspection points in steam systems:

  • Defective steam traps and inadequate insulation lead to wasted steam, producing unnecessary steam to maintain the necessary supply.

Identify and quantify:

  • Log energy consumption at the boiler and compare it with base consumption.
  • Perform a thermal scan of pipes and steam traps to identify missing insulation and blockages.


Ask our experts for advice

Making returns transparent

Considering the aforementioned lack of industry standards, how do we really know which systems have the most potential energy yield? Our best source of information at the moment is provided by the examples of common situations. Here are some examples of common industrial systems.

Electromechanical system inspection

Type of facility: Steel recycling plant in Germany
Type of equipment: fan with belt drive, for process cooling
Measurements conducted: vibration measurements
Problems identified: slight imbalance was detected, in addition to misalignment and bearing wear.
Savings realised: Rebalancing was necessary. A 350-kW engine was running at 80 per cent of its rated power; the measured power was about 280 kW. After rebalancing, 3 per cent less energy was consumed. At a tariff of 0.11 euros/kWh, this results in annual savings of 8,094 euros.

Compressed air system inspection

Type of facility: production
Type of equipment: compressed air system
Measurements conducted: test of compressed air system with ultrasound (recommended full compressor data logging)
Problems identified: the amount of compressed air produced compared to actual demand.
Savings realised: Multiple savings opportunities were found. Total annual savings of €50,600. The compressor is switched off on weekends: annual savings of €32,700. Solenoids are installed to turn off the air supply when machines are switched off: annual savings of €7,100. Repair of 36 leaks: annual savings of €4,800. Filters installed in the system at a one-off cost of €6,000; annual savings as a result of these filters: €6,000.

Inspection of steam trap

Type of facility: production
Type of equipment: boilers and steam pipes
Measurements conducted: thermal scanning of steam pipes
Problems identified: six malfunctioning steam traps; steam leakage from coils of a electroplating tank; steam leakage from electroplating pipes: opportunities for condensate recovery
Savings realised: Six malfunctioning steam traps were replaced at a cost of €500 each. Savings realised: €3,200 per steam trap based on known costs, for generating calculations of steam and heat loss. Total savings: €16,200.
Next step: Log energy consumption on the boiler's supply panel before and after addressing leaks and condensate problems.

Higher productivity or lower overhead?

The next question is a fun one to answer: once you have decided which route to take to reduce energy consumption, can you use those savings to increase plant output (produce higher volumes at the same kWh consumption) or for other business strategies (profit margins, price realisation)?

Reducing energy consumption is simply good for business. By logging the consumption of each major system and mapping these costs against energy bills to determine where and when consumption is occurring, companies can often realise savings through simple adjustments to their processes and work schedules. Companies can easily identify which equipment is inefficient and outdated and justify and prioritise replacement. And by reducing overall energy consumption, companies reduce operating costs and improve their market competitiveness.

Tips for cost savings

Adapt business processes to take advantage of:

  • lower energy costs at certain times of the day
  • times when machines can be switched off
  • sensors and controls that allow systems to be switched off when they do not need to be in operation

Set schedules for start-up/shutdown of infrastructure equipment for working hours and for out-of-working hours.

Start appliances with high energy consumption staggered and at least 15 minutes apart to avoid costs due to peak consumption.

Fit variable frequency drives (VFDs) to large motors and replace bad motors with high-efficiency models.

Read more
problems with the PV system

Solving common PV system problems

problems with the PV systemThe number of solar installations across the country is growing faster every year, creating an ever-increasing demand for technicians who know how to efficiently and effectively fix failures of photovoltaic (PV) systems.

PV system troubleshooting usually focuses on four parts of the system: the PV panels, load, inverter and combiner boxes.

The Fluke 393 FC CAT III 1500 V solar clamp meter is the best instrument to use in most areas of a solar installation. This is the world's only CAT III 1500V rated, IP 54 AC/DCa current clamp with features - such as DC voltage, audio polarity and visual continuity - tailored for testing and measuring in solar PV applications.


Ask our experts for advice

1. Troubleshooting the PV system

First check the output of the entire system at the metering system or inverter. Before you start troubleshooting, check and note the input voltage and current level of the array's inverter. You are likely to encounter one of two scenarios:

All or part of the PV system is down or not producing power; this may be related to a problem with the inverter.
Or the output of the PV system is less than expected; this may be related to a problem with one of the arrays or modules.
Trace individual branch wiring backwards from the concentrator. Visually inspect the entire system for obvious damage or inadvertent disconnection. Once you find the faulty module or array, check all wires, switches, fuses and circuit breakers. Replace blown fuses; reset circuit breakers and switches. Check for broken wires and loose or dirty connections; replace and clean if necessary. Watch for loose connections between modules. They may have come loose and caused lack of contact.

The combiner box can be a great place to troubleshoot system problems, as it returns individual wires from the modules to the system. Each module may have a fuse that you need to check with your Fluke 393 FC.

Wiring problems and loose connections can also cause a module to produce too low a voltage. Check all wiring connections. If a module output is low, it could mean that a single cell section is bad. These can be retraced using the 393 FC at the junction boxes until the culprit is found.

The Fluke 393 FC gives an audio polarity warning when you test Voc. If you notice that the polarity is reversed, this could mean that other circuits in the combiner box are inadvertently connected in series, resulting in voltages above the inverter's maximum input voltage.

Dirt or shadow on the modules themselves can cause reduced output. Although the modules are usually designed to be maintenance-free for years, they may need cleaning. Pollen and dust can be a significant problem in some parts of the country.

2. Solving problems with PV loads

The PV system is used to control building electrical loads; any problems with the loads also affect the system. The first step is to check the load switches, fuses and circuit breakers with the Fluke 393 FC to see if the load connection has the correct voltage. Next, use the 393 FC to check the fuses and circuit breakers. If you find blown fuses or tripped circuit breakers, find the cause and fix or replace the faulty component. If the load is a motor, an internal thermal breaker may be tripped or there may be an open winding in the motor. For testing purposes, connect another load and see if it works properly.

As with any electrical system, check for broken wires and loose connections. Clean all dirty connections and replace all bad wiring. If the power is off, then check for earth faults and repair them. If fuses or breakers blow or trip again, there is a short circuit that you need to locate and repair.

If the load still fails, use the Fluke 393 FC to check the system voltage at the load connection. The wire size may be too small and need to be increased. The wires running to the loads may also be too long. This is shown as a low voltage at the load. In this case, reduce the load on the circuit or run a larger wire.


Schedule a consultation

problems with the PV system3. Troubleshooting PV inverters

You probably work with inverters every day, so you are used to checking AC and DC power. The inverter in a PV system can also fail and cause problems. The inverter converts direct current from the PV system into AC mains power for use in buildings.

If the inverter does not produce the correct output, first check and note the working DC input voltage and current level of the inverter. On the AC side, use the Fluke 393 FC to check the inverter's output voltage and current level. Many have a display that shows the performance of the current inverter and the system. Because the 393 FC produces a true-RMS reading, you can use the voltage and current to measure and record the kilowatt (kW) output. If possible, use the inverter display to show the current total kilowatt hours (kWh). You can then write down this value and compare it with the value recorded during the last inspection. On the DC side, you can use the 393 FC to check the DC power supply and store the value in the Fluke Connect™ app on your phone.

If the inverter is not producing the right amount of current, there could be several problems - all of which you can easily check with the Fluke 393 FC:

  • Blown fuse
  • Activated circuit breaker
  • Broken wires

Use the Fluke 393 FC to measure the AC output side of the inverter; the load of the inverter may have an excessive current demand. With the dual display showing AC voltage and frequency, you can determine whether the inverter's AC output is working correctly.

The inverter can be connected to the local utility. The inverter's AC current fluctuates with the level of solar input on the array. The inverter maintains the correct output voltage and phase to the utility. Utility voltage problems may cause the inverter to shut down. In this case, contact the utility company for repairs.

4. Troubleshooting in combination boxes

When troubleshooting combiner boxes, current strength measurements and calculations are crucial to determine whether the PV arrays are working correctly. Measuring current on individual arrays or combining current measurements helps you determine if a cell is not working properly.

The thinner jaw design of the Fluke 393 FC current clamp allows you to get several conductors into the jaw for combined current measurements, even in tight or crowded spaces such as inverters or combiner boxes.

Read more